To start, I don't have a link to the exact shrink film I used for this tutorial. I will note that the white shrink film I just ordered for this DID NOT work! Booo! It was a great price on Amazon, but apparently it is slightly thicker. I used frosted shrink film that I already had on hand. I know I ordered from an assortment pack that included white, frosted, and clear. I haven't used the clear much because I wanted an opaque finish. I'm going to be testing out a few others including the printable shrink film soon, so I'll update you when I'm done. For now, my best guess would be this one:
 Frosted Shrinky Dinks
However, it's not available through prime right now. Bummer.
Another one to try is this one:
Frosted Shrinky Dinks
However, it's not available through prime right now. Bummer.
Another one to try is this one: Sanded Shrink Film It's sanded and would give you a lot options when it comes to decorating your creations IF it cuts cleanly.

For now, on to the process I used to make this name charm. First you simply need to type your name into Silhouette Studio and select a font. A picked a cute little script called "A Gentle Touch". It's not too wide so it was going to be easier to fill in the letters which is what I wanted.
Keep in mind using the "sketch" settings doesn't color things in. It only follows lines just like a cut setting would. So to make this solid I used a narrow font and added an internal offset.


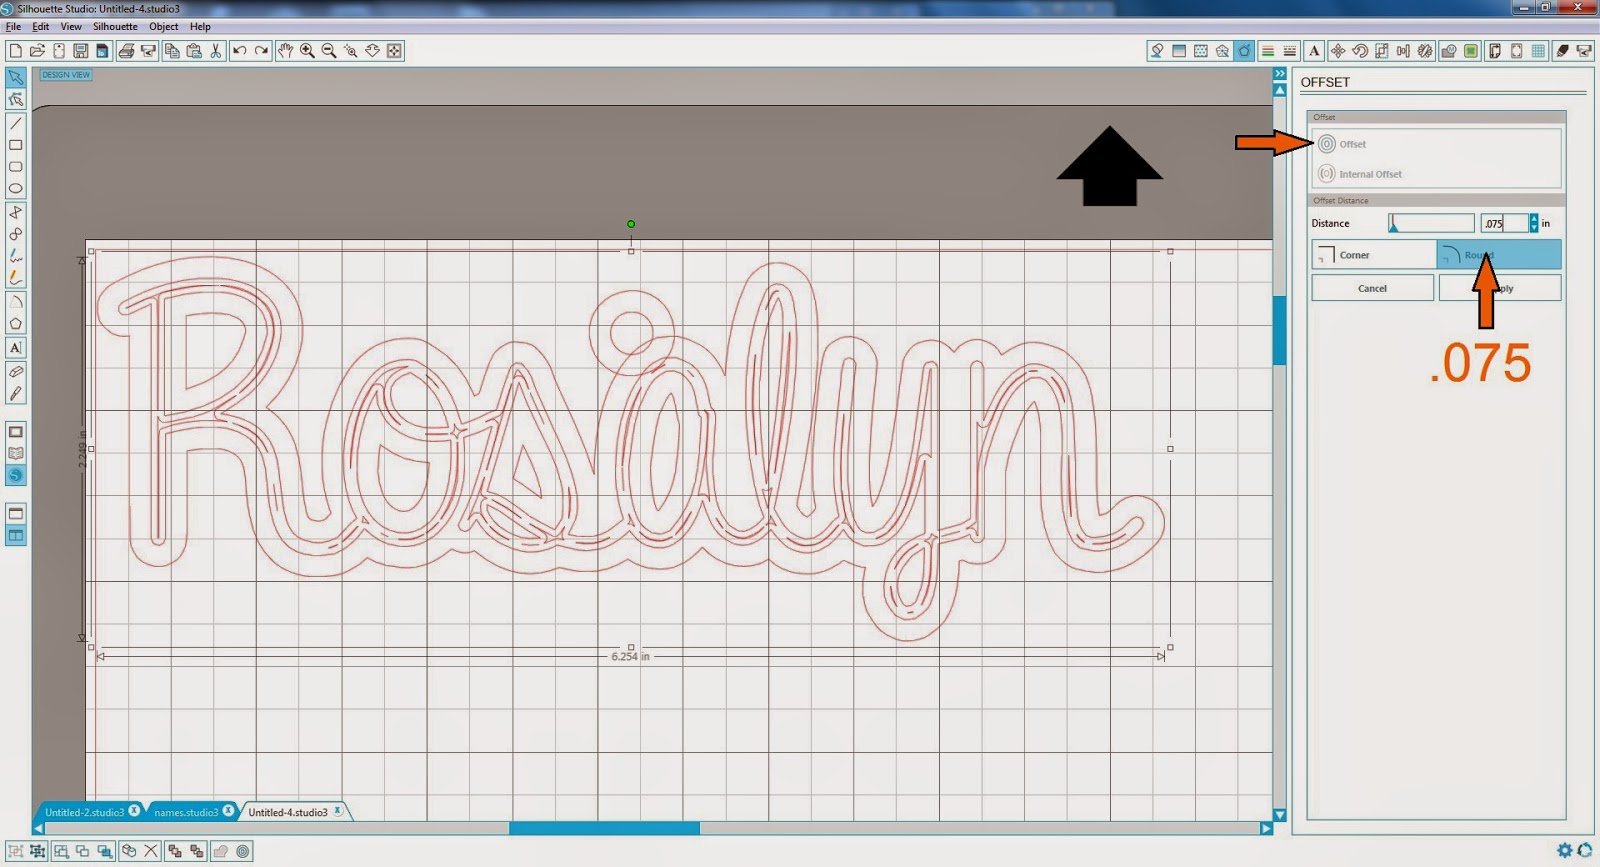
Next I selected the name and the circle and added an offset. Make sure you don't select any lines you have in the middle or will try to offset all of those too. You just want the original name outline. I did a narrow offset of .075 and when I applied it, it seemed to automatically weld the ring to the rest of the name.

 Now I'm reading to start working with my Cameo. First I want to make the marks with my sharpie. (Here's a great deal on some sharpies. You get 24 for just over $10! I LOVE sharpies.) This is a Silhouette pen holder. I know there are a lot of hacks out there and other things that work, but for $10 I thought this would save me a lot of time and effort. I did find one red sharpie weirdly didn't fit. It was just slightly too big, but so far all my others have fit fine using the large pin holder. I honestly think this one was pressed out just a little too far. It made a pretty thick line, but with an ultra fine pint sharpie you can get incredible details with this. Silhouette pen holder
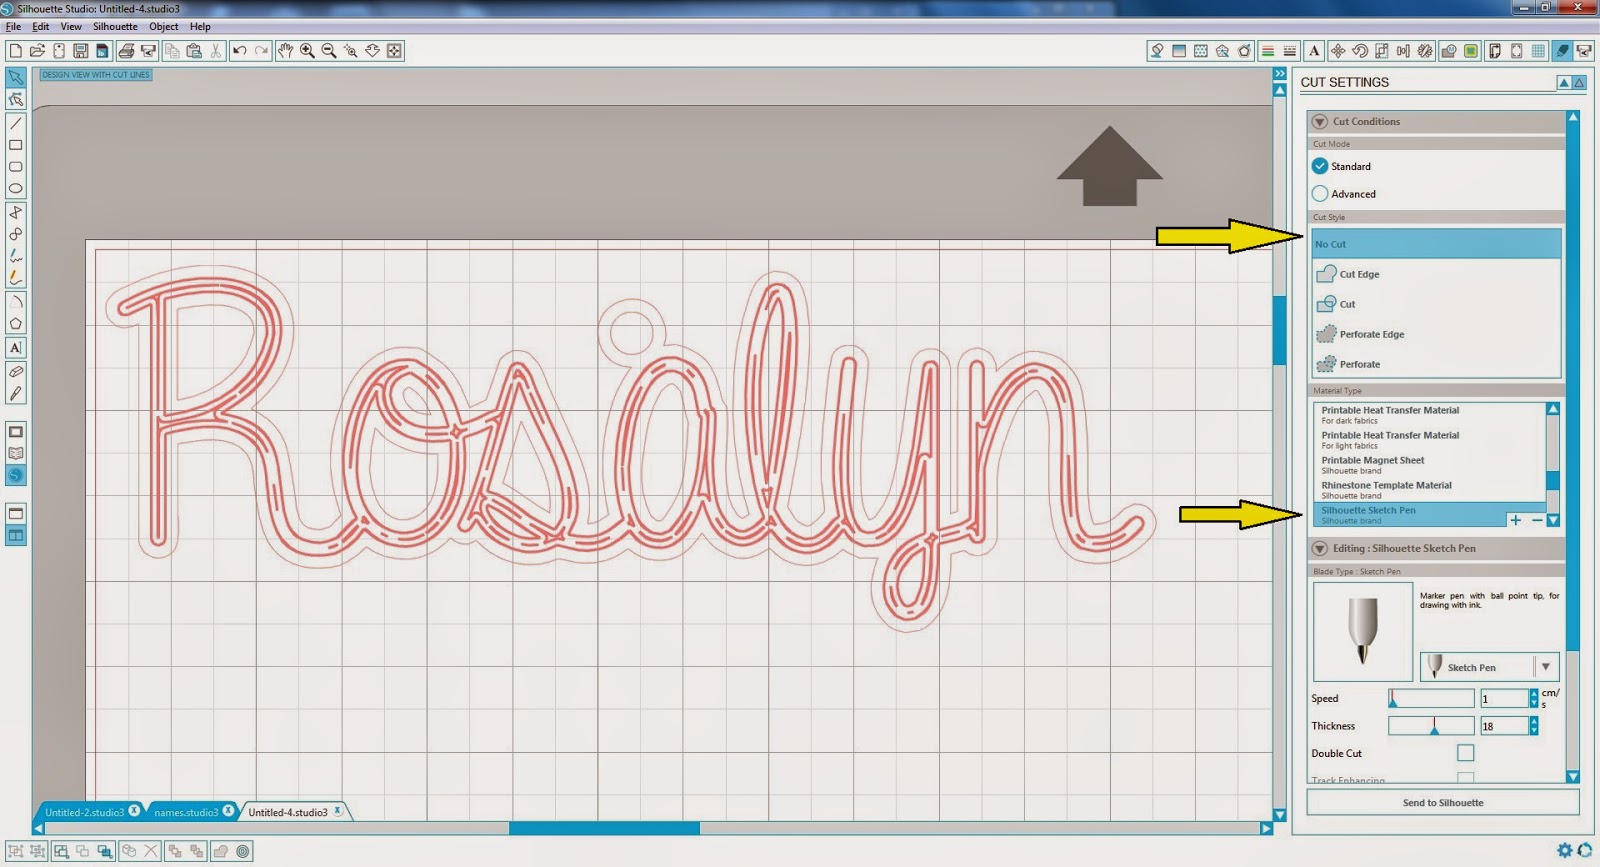 Once your marker is loaded you want to turn off all the lines except your letters. I just clicked on the offset line and my loop then selected "No Cut". Then select your sketch pen setting. I had a little smearing on the white shrink paper, so I'd make sure to keep your speed to 1 to allow the most drying time possible.
 ***Here's the most important part: From this point on DO NOT UNLOAD! You will never get it loaded back in exactly the same. If anything moves around it's not going to work. After you draw your name you need to take out the marker and put your blade back in on the 10 setting. DO NOT UNLOAD.
Once you've got your blade in you want to select the parts to cut. I wanted to basically only cut the exterior out line and the center of my loop. I wish I can cut a little detail out the loop of my "l" and "y", but it looks fine with out it.


 For your cut settings, I just selected "material". This is basically the highest cut settings. Blade 10, Speed 1, Depth 33, double cut.
 When it's done DO NOT UNLOAD. This part is the key and super easy, just hit "start" again and do the exact same cut. So you're basically doing a quadruple cut. Obviously if anything moves your risk your cuts not lining up with each other or the original drawing.
 Now, you can finally unload. :) It was totally worth the wait. It should pop out fairly easily. If anything hangs up a little just use an exact knife to trim it off. Now place it in a preheated 350 degree oven. Mine went a little crazy. Don't panic! This is why it's often suggested you lay wax paper over your design, but this one came out fine. I just used a knife to straighten it out a little before pulling it out.

All Done! Now your charm is half the size and much thicker. Here are a few others things I've make with shrink paper. Have fun!


Update: I'm sad to say the Ink Jet Shrink Film did NOT cut in the Cameo. I attempted to cut two little bats using my PixScan mat. While the PixScan worked wonderfully, cutting one nearly perfect and one with an offset, it just couldn't cut all the way through despite multiple cuts. It did score it nicely so if I had something I really wanted to print and cut I could use this as a starting point and finish the job with an x-acto knife.
Thank you very much for this great post. buy dvd chesapeake shores season 2
ReplyDeleteGood post but I was wondering if you could write a litte more on this subject? I’d be very thankful if you could elaborate a little bit further. Appreciate it! buy dvd the bold type season 1
ReplyDelete